From Idea to Reality in under 50 minutes (mostly) with Angular and Firebase - Part I
Good morning traveller! Today I want to appeal to the builder in you, the tinkerer, the dreamer. The person who loves coding, building stuff from scratch, sometimes to solve a problem, sometimes just because it’s goddamn fun.
How often do you have a new idea for a cool side project?
You’re in the shower, and all of the sudden, you have this amazing idea… but somehow you never find the time to do anything about it. And it slowly withers and dies and ends up in the lonely cemetery of ideas…
Does this sound familiar to you? How many of you have ideas that are withering abandoned in the darkest corner of your brain?
A while back I read a book - Die Empty - in which pages I read something like the following (I am mostly sure it was this book… 80%… 60%?):
The graveyard is the richest place on earth, because it is here that you will find all the hopes and dreams that were never fulfilled, the books that were never written, the songs that were never sung, the inventions never shared, the cures never discovered...
And this is super sad, and very true. We live in a society that pushes us towards mindless consumption and we forget to exercise one of the most giving and fulfilling skills we have as humans: creating.
And that sucks!
Fear not! And don’t be saddened either! For today I’m going to show you a friction free way to bring your ideas to life with Angular and Firebase.

Get Started! My Idea! Baby-gotchi
To highlight the goodness of the Angular and Firebase combo I’ll build a quirky idea I had a couple of months ago when I started thinking about my talk for Devsum 2017.
So I’m soon to become a father… Wiii!! And I’m going to need all the help I can get. I thought… wouldn’t it be cool if I could build a baby simulator? An application where I can start taking care of the baby’s needs and wants? Something that helps me get prepared for the coming of my firstborn? And so the idea of baby-gotchi was born.
Here’s a sneak peek of the final version to get you started envisioning what we’re gonna build:
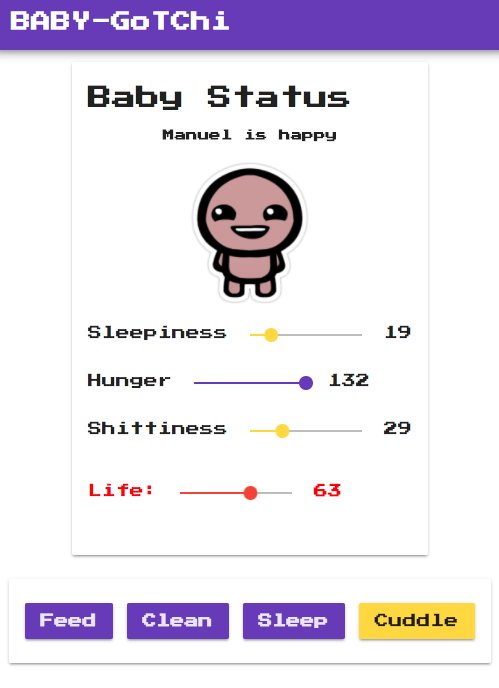
And by the way, the baby image is courtesy of the super duper awesome and scary Binding of Isaac.
First Thing: Prototyping, Sketching and Storyboarding
The first thing that I do when I start any project, be it an app, a presentation or a book, is to open my notebook and start writing notes.
There’s something magical about pen and paper: That complete freedom to sketch your ideas that a blank page affords, that closeness between your brain, the ink and the paper. All of it gets the creativity juices flowing.
At this point just let your ideas flow through, don’t have any filters nor reservations, just put everything into the paper. These are some of my sketches for baby-gotchi:
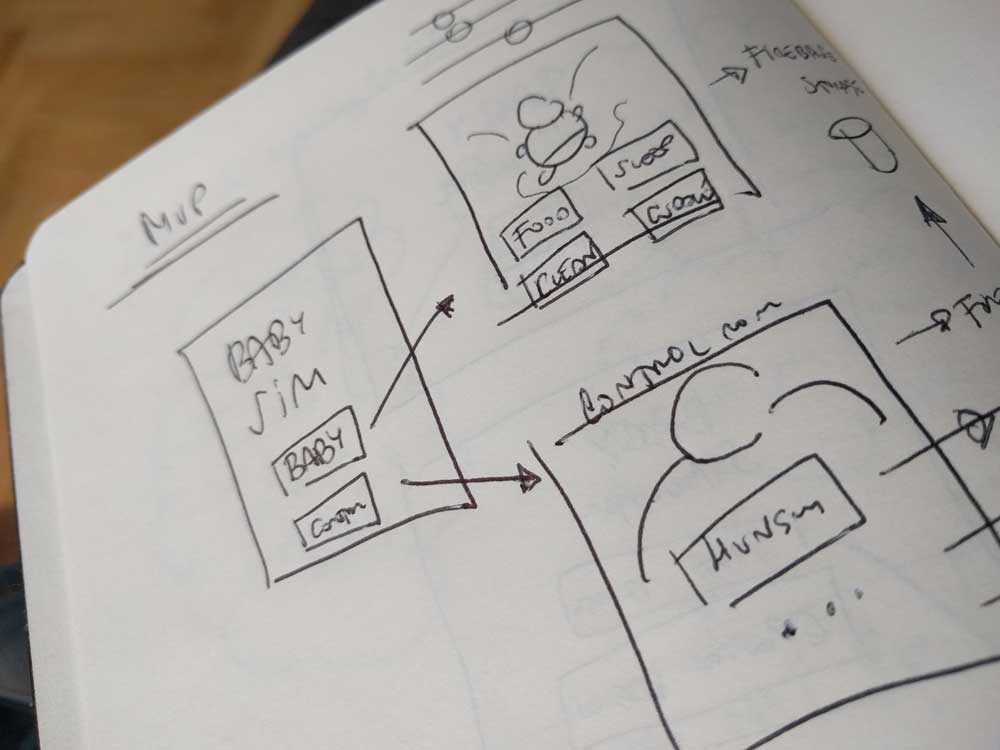
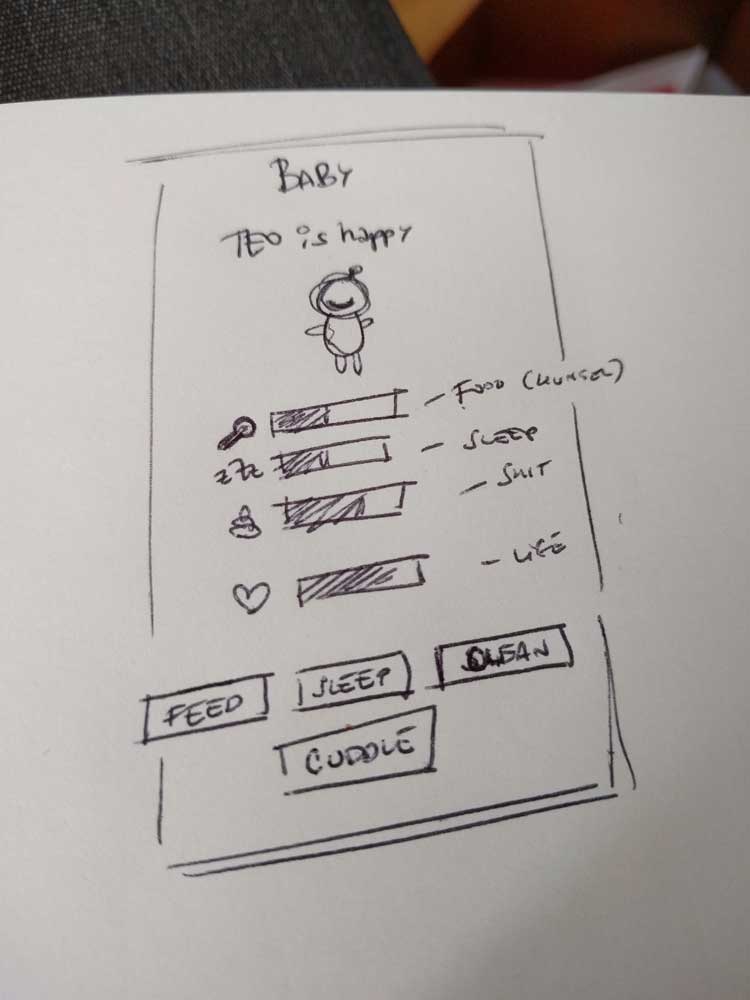
And now you can get started! My advice is that you start by focusing on the core idea of your project, the MVP (Minimum Viable Product) if you will, and begin building it right away. Removing most of the stuff and focusing on the core idea will keep you motivated as you make progress on the things that matter and give you the better return on your time investment.
The core of baby-gotchi will be:
- To give birth to a baby
- To show a list of your babies
- To show the details of a baby and how he or she is feeling
- To be able to take care of a baby by feeding him or her, cleaning her or him, cuddling…
- To have a mechanism that affects the status of the baby and makes her/him be hungry, sleepy, etc
- To be able to control the baby and make him/her hungry, sleepy or shitty (I am pretty sure that’s not a real word). This shouldn’t be necessary but it gives for a great demo at a conference where the attendees are furiously clicking “I’m hungry!”, “I’m sleepy!” and you on stage take care of the baby with cuddles.
Awesome! Let’s get started with the coding!
Creating a New Project With The Angular CLI
A core idea of Angular is to provide a complete platform to build awesome web applications. A platform that helps you all the way from the initial stages of development to deploying your application to your production environment. A central part of this experience is handled by the Angular cli, a command-line interface tool that let’s you create a new project, run it on a dev server, scaffold parts of your app and much more.
With the Angular cli creating a new Angular project is as trivial as typing the following:
PS> ng new baby-gotchiThis will create an Angular application and setup a complete development environment for you with everything that you need to build Angular apps: TypeScript transpilation, a dev server to host your app, bundling, minification, uglification, aot, etc, etc.
For our baby-gotchi we will use SASS and routing so I’ll modify the line above slightly to set up both SASS and routing in our new project:
PS> ng new baby-gotchi --style=scss --routingAfter a short while you’ll have your application ready for you inside the baby-gotchi folder. We go inside the folder and start our development server to verify that everyhing went according to plan. Just type:
PS> ng serve --openAnd you’ll get a web dev server running and hosting your app courtesy of Webpack the technology upon which the angular cli is built. A browser will open automagically and you’ll be able to see the starting page of your app with some links to Angular related documentation to get you started.
A List of Babies
The first thing that we want to do is to show a list of babies. But what are babies? Since we can just have little human beings being part of our app we need a way to represent a Baby in our program. That’s what classes are for.
Angular makes use of TypeScript a superset of JavaScript that supports ES2015 features and therefore it has classes. Moreover, the angular cli has the concept of generators. You can think of generators as small little helpers that scaffold parts of your app for you. For instance, in order to create a class you can type the following:
PS> ng generate class babyThis will create a class to represent a Baby. You can now open our project in your favorite editor and edit that Baby class. I’ll be using Visual Studio Code which is a lightweight and free text editor that is great for Angular. The following command will open VSCode in my app’s folder:
PS> code .Open the Baby class (Try Command+P in Mac or Control+P on Windows, that’s the fastest way to go to files in VSCode) and edit it to create a programmatic representation, an abstraction of a baby:
export class Baby {
    sleepiness = 0;
    hunger = 0;
    shittiness = 0;

    life = 100;

    constructor(public name: string) {}
}
So a Baby is something that has a name, life and some other stats. Now let’s show a list of babies.
Everything that you “show” in Angular, every bit of user interface with some associated behavior is a component. A component in Angular will have a template (the UI written in HTML) and a class to control this template’s behavior (in TypeScript). Therefore, if we want to show a list of babies we will create a BabiesComponent. Luckily, the Angular cli has a generator for that. Type:
PS> ng generate component babiesWhich will output the following:
create src/app/babies/babies.component.scss
create src/app/babies/babies.component.html
create src/app/babies/babies.component.spec.ts
create src/app/babies/babies.component.ts
update src/app/app.module.ts
So it has created a file for the component’s UI (.html), the behavior (.ts), the styles (.scss) and the tests (.spec.ts) and it has registered it in our application (app.modules.ts). Let’s open the template babies.component.html and update it to display a list of babies:
<h1>Babies Born</h1>
<ul>
    <li *ngFor="let baby of babies">
      {{baby.name}}
    </li>
</ul>
The template above uses the *ngFor directive to display an li element for every baby in the babies array. Then it uses what we call an interpolation binding to show the name of each baby inside each li (that was the {{baby.name}}.
But where does the babies array come from? It comes from the component class babies.component.ts. It doesn’t yet have a babies property but we will add it right away:
import { Component, OnInit } from '@angular/core'
import { Baby } from 'app/baby'

@Component({
  selector: 'app-babies',
  templateUrl: './babies.component.html',
  styleUrls: ['./babies.component.scss'],
})
export class BabiesComponent implements OnInit {
  babies = [new Baby('Lola'), new Baby('Manuel')]

  constructor() {}
  ngOnInit() {}
}
We say that the component BabiesComponent exposes the babies array in its public interface so that the template can bind to it and show its contents to the user through the user interface.
If you go back to the browser that you opened earlier it should have been updated to reflect… nothing! What? or well, the initial page with the Angular documentation stuff. But where are our babies?
The application that we have setup uses routing. Routing is a mechanism that lets you navigate between different parts of your application associating urls with application state. It is contained in the app-routing.module.ts which now looks pretty lonely:
import { NgModule } from '@angular/core'
import { Routes, RouterModule } from '@angular/router'

const routes: Routes = [
  {
    path: '',
    children: [],
  },
]

@NgModule({
  imports: [RouterModule.forRoot(routes)],
  exports: [RouterModule],
})
export class AppRoutingModule {}
The variable routes right there is a routing table that maps paths in the browser URL to components in your app. Since there’s no mappings there, the app doesn’t know when to render or BabiesComponent. Let’s remedy that by adding the following:
import { NgModule } from '@angular/core'
import { Routes, RouterModule } from '@angular/router'

const routes: Routes = [
  {
    path: 'babies',
    children: [
      {
        path: '',
        component: BabiesComponent,
      },
    ],
  },
  {
    path: '**',
    redirectTo: 'babies',
  },
]

@NgModule({
  imports: [RouterModule.forRoot(routes)],
  exports: [RouterModule],
})
export class AppRoutingModule {}
Let’s also not forget to remove the initial code from app.component.html so we only leave the router-outlet which is used by the router to inject the active route (the BabiesComponent in this case):
<router-outlet></router-outlet>And voilá! Now you should be able to see a list of two babies reflected by their names: Lola and Manuel. This is a great starting point, showing some fake data in the screen, but it’d be much better if we could show real data from a database. Enter Firebase!
Getting And Saving Real Data From and To Firebase
Firebase is a service that we offer at Google to help you build mobile apps faster and better. It is a platform as a service (or backend as a service) that offers diverse tools like analytics, a realtime database, authentication, messaging, crash reporting, etc, so that you can focus on developing your app and taking care of your users.
Firebase realtime database works great with Angular for several reasons:
- It notifies your client apps when data changes in the database. This pushing of data matches perfectly with the use of Observables that is so natural to Angular.
- The AngularFire2 library helps you integrate Angular with Firebase and is very straigthforward to use
- It is super easy to setup
Setting Up Firebase
So let’s get started! You need to create a firebase account which is free and then create a new project. After that we install AngularFire2 with npm as follows:
PS> npm install --save firebase angularfire2And add it to our Angular app. Whenever you want to use an external library in Angular you need to import its modules and add them as imports in your Angular Module. For this simple app we’ll do that in app.module.ts:
// other imports...

/* Angular Fire */
import { AngularFireModule } from 'angularfire2'
import { AngularFireDatabaseModule } from 'angularfire2/database'
// Environment configuration
import { environment } from 'environments/environment'

@NgModule({
  declarations: [AppComponent, BabiesComponent],
  imports: [
    BrowserModule,
    AppRoutingModule,
    AngularFireModule.initializeApp(environment.firebase),
    AngularFireDatabaseModule,
  ],
  bootstrap: [AppComponent],
})
export class AppModule {}
The environment.firebase variable contains the configuration for your firebase project that you can obtain within the Firebase UI. It will look sort of like this:
export const environment = {
  production: false,

  // Firebase configuration
  firebase: {
    apiKey: 'some api key...',
    authDomain: 'auth domain...',
    databaseURL: 'database url...',
    projectId: 'projectId...',
    storageBucket: 'storage bucket ...',
    messagingSenderId: 'message sender id...',
  },
}
Using Firebase To Get a List of Babies
Now that everything is setup let’s show a list of babies from our Firebase realtime database. We update our BabiesComponent as follows, starting with the class babies.component.ts:
import { Component, OnInit } from '@angular/core';
import { Baby } from 'app/baby';

import { AngularFireDatabase, FirebaseListObservable } from 'angularfire2/database';

@Component({
  selector: 'app-babies',
  templateUrl: './babies.component.html',
  styleUrls: ['./babies.component.scss']
})
export class BabiesComponent implements OnInit {
  babies: FirebaseListObservable<Baby[]>;

  constructor(private db: AngularFireDatabase) { }

  ngOnInit() {
    this.babies = this.db.list('/babies');
  }
}
There’s a couple of things going on here:
- We inject the
AngularFirebaseDatabaseusing dependency injection (that’s how we inject dependencies in Angular) - We then use it during our components initialization (which happens inside
ngOnInit) to retrieve a list of babies from our yet-not-existing database using the'/babies'url as identifier. - We also expose the
babiesobservable to our template.
Since we’ve changed the babies from an in-memory array to an observable we need to update our template. Angular provides a special pipe, the async pipe that allows your template bindings to consume observables (which are asynchronous). Our updated template will look like this:
<h1>Babies Born</h1>
<ul>
    <li *ngFor="let baby of babies | async">
      {{baby.name}}
    </li>
</ul>
If you take a look at the UI you’ll be able to see nothing! There’s no data in the database yet so that shouldn’t surprise us.
Using Firebase to Create a Baby
Let’s add some data in the form of a beautiful newborn baby. We start by adding a button to the template of our BabiesComponent:
<h1>Babies Born</h1>
<ul>
    <li *ngFor="let baby of babies | async">
      {{baby.name}}
    </li>
</ul>
<button (click)="giveBirth()">Give birth!!!</button>
The (click)="giveBirth()" is what we call an event binding in Angular. It let’s us bind the click event on that button to a method in our component class giveBirth. We implement that method as follows:
import { Component, OnInit } from '@angular/core';
import { Baby } from 'app/baby';

import { AngularFireDatabase, FirebaseListObservable } from 'angularfire2/database';

@Component({
  selector: 'app-babies',
  templateUrl: './babies.component.html',
  styleUrls: ['./babies.component.scss']
})
export class BabiesComponent implements OnInit {
  babies: FirebaseListObservable<Baby[]>;

  constructor(private db: AngularFireDatabase) { }

  ngOnInit() {
    this.babies = this.db.list('/babies');
  }

  // create new baby!
  giveBirth() {
    const newBaby = new Baby('Manuel');
    const babies = this.db.list('/babies');
    // this saves the baby
    babies.push(newBaby);
  }

}
And Tada! Now when we click on that button we bring a new programmatic baby into the world and store it in our realtime database. Or wait… what’s all that red stuff on the dev console?
Ok, let’s try again now that we’ve updated our database settings. If you take a look at the UI you’ll see how when you click on the button a new item "Manuel" is added to the list. Woho!
You can also verify that the data is stored in your database by taking a sneak peek in your Firebase Account. The Project that you created should have a Database where you should see a babies node and your little baby.
Adding Some Randomness Into The Birth
Having always a Manuel seems kind of boring isn’t it? To spice things up lets generate a random name every time the user clicks on the give birth button.
This type of logic in your application that could be useful to share and reuse in different components belongs in what we call a Service in Angular. Again, the Angular cli lets you create services with the swipe of a command:
PS> ng generate service randomPicker --module appThis will create a new service RandomPickerService and register in your main module. The service will look like this:
import { Injectable } from '@angular/core'

@Injectable()
export class RandomPickerService {
  constructor() {}

  pickAtRandom(items: any[]) {
    const randomIndex = Math.floor(Math.random() * items.length)
    return items[randomIndex]
  }
}
And will expose a single method pickAtRandom which will select a random element from an array that is passed as argument.
We can now update our BabiesComponent to use that service. We start by injecting it through the component’s constructor like this:
// other imports
import { RandomPickerService } from 'app/random-picker.service';

export class BabiesComponent {
  constructor(private db: AngularFireDatabase,
              private randomService: RandomPickerService) { }

  // more codes...
}
And then we update the giveBirth method:
// imports

export class BabiesComponent {
  // more codes...

  giveBirth() {
    // create new baby!
    const newBaby = new Baby(this.pickRandomName())
    const babies = this.db.list('/babies')
    babies.push(newBaby)
  }

  pickRandomName() {
    const names = [
      'Carlos',
      'Laura',
      'John',
      'Augustina',
      'Manuel',
      'Lola',
      'Isaac',
      'Georgina',
      'Paolo',
      'Maria',
      'Ronaldo',
      'Ronalda',
    ]
    return this.randomService.pickAtRandom(names)
  }
}
Opening the Path to Caring and Controlling
Now that we can list our babies, it’d be useful to have additional buttons to be able to take care and control each one of them. We’ll add a couple of buttons for that purpose. In our babies.component.html add:
<h1>Babies Born</h1>
<ul>
    <li *ngFor="let baby of babies | async">
      {{baby.name}}
      <a [routerLink]="[baby.$key, 'care']">Take care</a>
      <a [routerLink]="[baby.$key, 'control']">Control!!!</a>
    </li>
</ul>
<button (click)="giveBirth()">Give birth!!!</button>
The routerLink directive lets us create links that will work in consort with our routing. Soon we will have two new routes babies/key/care and babies/key/control that we will associate to two new components to take care and control our babies. But for now…
Making Things Look Nicer With Angular Material
Before we continue with the rest of the parts of our application we’re going to bring some flare and beauty into the mix. As we said earlier, Angular aims at being a complete platform that helps you build awesome web apps. Awesome web apps have awesome UIs and outstanding User Experience, and therefore Angular comes with a great suite of components in the form of the Angular Material library, and a flexible layout system with Angular Flex Layout.
You can add both to your project via npm:
PS> npm install --save @angular/material @angular/animations @angular/flex-layout hammerjsAnd add them to your application in your application module app.module.ts:
import { BrowserModule } from '@angular/platform-browser'
import { NgModule } from '@angular/core'

import { AppComponent } from './app.component'
import { AppRoutingModule } from 'app/app-routing.module'

import { BabiesComponent } from './babies/babies.component'

/* Material Design and Flex Layout */
import { MaterialModule } from '@angular/material'
import { FlexLayoutModule } from '@angular/flex-layout'
import { BrowserAnimationsModule } from '@angular/platform-browser/animations'
import 'hammerjs'

/* Angular Fire */
import { AngularFireModule } from 'angularfire2'
import { AngularFireDatabaseModule } from 'angularfire2/database'
import { AngularFireAuthModule } from 'angularfire2/auth'
import { environment } from 'environments/environment'

/* Services */
import { RandomPickerService } from './random-picker.service'

@NgModule({
  declarations: [AppComponent, BabiesComponent],
  imports: [
    BrowserModule,
    AppRoutingModule,
    MaterialModule,
    BrowserAnimationsModule,
    FlexLayoutModule,
    AngularFireModule.initializeApp(environment.firebase),
    AngularFireAuthModule,
    AngularFireDatabaseModule,
  ],
  providers: [RandomPickerService],
  bootstrap: [AppComponent],
})
export class AppModule {}
And in our styles.scss file where we will select the default theme for our application (the color palette and such):
@import '~@angular/material/prebuilt-themes/deeppurple-amber.css';Excellent! With the aid of Angular Flex Layout and Angular Material we can update our AppComponent template app.component.html to represent an application shell with a navbar on top and some branding (pay attention to the comments):
<!-- this means, layout my child nodes within a column and fill the complete window -->
<section fxLayout="column" fxFill>

  <md-toolbar color="primary" class="mat-elevation-z6">
    <a class="app-title" [routerLink]="['/']">BABY-GoTChi</a>
  </md-toolbar>

  <!-- this means, layout my child nodes within a column, starting from the top, then align them in the center horizontally and leave 12px between them -->
  <section fxFlex fxLayout="column" fxLayoutAlign="start center" fxLayoutGap="12px" class="app-content">
    <router-outlet></router-outlet>
  </section>

</section>
We’ll also add some styles within style.scss (which represents our application global styles):
- CSS Resets
- A new 8-bit style font that will make our app shine in a new nerdy light
// Angular Material Theme
@import '~@angular/material/prebuilt-themes/deeppurple-amber.css';

// Font from Google Fonts
@import url('https://fonts.googleapis.com/css?family=Press+Start+2P');

// Resets
html, body {
    padding: 0;
    margin: 0;
    font-family: 'Press Start 2P', cursive;
}

// Title
.app-title {
    font-family: 'Press Start 2P', cursive;
    color: white;
    text-decoration: none;
}
We then update our BabiesComponent template in babies.component.html:
<h1>Born Babies!</h1>

<section fxLayout="column" fxLayoutGap="12px">

  <md-card *ngFor="let baby of babies | async">
    <md-card-title>{{baby.name}}</md-card-title>
    <md-card-actions>
        <a md-button color="primary" [routerLink]="[baby.$key, 'care']">Take care</a>
        <a md-button color="accent" [routerLink]="[baby.$key, 'control']">Control!!!</a>
    </md-card-actions>
  </md-card>

  <button md-raised-button color="accent" (click)="giveBirth()">Give Birth!</button>
</section>
And the component styles in babies.component.scss so the content appears centered:
:host {
  width: 50vw;
  text-align: center;
}
Noticed the weird :host CSS selector? The :host selector is a CSS scoping selector natural to web components that lets you style the root element of a component. In our case the :host selector refers to the <app-babies> element itself.
The reason for the existence of this selector is that Angular provides style encapsulation inside a component, that is, the styles that you define inside a component only affect that component. In the absense of special selectors the styles that you define inside a component won’t affect any other parent nor child components. Pretty cool right? This means that we don’t need to use conventions like OOCSS, SMACSS or BEM to create component-based CSS, and so you can simplify your CSS greatly.
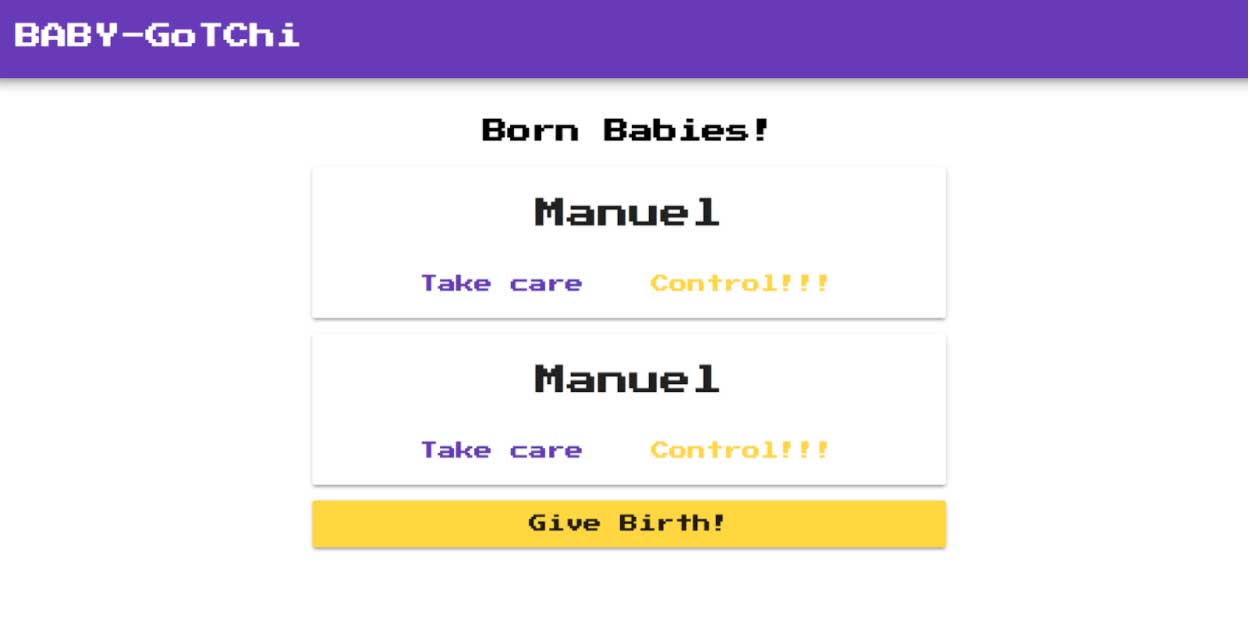
Your web app should now look like this:
Taking Care of Your Baby
So we have a list of babies and we can create new babies. The next step will be to be able to take a look at how our baby is doing, is he sleepy? tired? hungry? and take care of him or her.
We will continue being our most caring self in the next part of this series with more Firebase Databasing, Cloud Functions, Hosting, PWAs and more! Don’t miss it!

Written by Jaime González García , dad, husband, software engineer, ux designer, amateur pixel artist, tinkerer and master of the arcane arts. You can also find him on Twitter jabbering about random stuff.
