From Idea To Reality in Under 50 Minutes (Mostly) With Angular And Firebase Part IV - Making Baby-Gotchi a Progressive Web App
This is the fourth and final part of the super series on Angular and Firebase. If you missed any of the first, second or third parts then I encourage you to take a look!

Welcome back!
For the last article of this series we’re going to do something really cool, we’re going to transform baby-gotchi into a Progressive Web App.
Progressive Web What?
Progressive Web Apps or PWAs are next generation user experiences for the web. They bring all the awesome stuff we’ve come to learn and love with native apps like great performance, offline capabilities and push notifications while keeping the best characteristics of the web: its infinite reach, low-friction and openness.
Sounds interesting? Then let’s build a PWA!
Ok… So What are Progressive Web Apps Exactly?
Progressive Web Apps are websites that are incrementally, or progressively enhanced to provide app-like user experiences. They are awesome on desktop but where they truly shine is on mobile, bringing the web finally on par with native apps.
In general, we say that PWAs are Reliable, Fast and Engaging:
- Reliable - Load instantly and never show the downasaur, even in uncertain network conditions.
- Fast - Respond quickly to user interactions with silky smooth animations and no janky scrolling.
- Engaging - Feel like a natural app on the device, with an immersive user experience.
If we dive into what Reliable, Fast and Engaging actually mean, we find that PWA fulfill the following characteristics. They are:
- Progressive – Works for every user, regardless of browser choice because it’s built with progressive enhancement as a core tenet.
- Responsive – Fits any form factor: desktop, mobile, tablet, or whatever is next.
- Connectivity independent – Enhanced with service workers to work offline or on low-quality networks.
- App-like – Feels like an app, because the app shell model separates the application functionality from application content.
- Fresh – Always up-to-date thanks to the service worker update process.
- Safe – Served via HTTPS to prevent snooping and to ensure content hasn’t been tampered with.
- Discoverable – Is identifiable as an “application” thanks to W3C manifest and service worker registration scope, allowing search engines to find it.
- Re-engageable – Makes re-engagement easy through features like push notifications.
- Installable – Allows users to add apps they find most useful to their home screen without the hassle of an app store.
- Linkable – Easily share the application via URL, does not require complex installation.
These are a hell of a lot of requirements and things to do but don’t be overwhelmed. You don’t need to implement all of them at once. You can improve the user experience of your website and make it more progressive, little by little, in small incremental steps. But where to start?
Great question! There is an awesome tool called Lighthouse that can analyze your website and guide you, step by step, in your PWA implementation.
Lighthouse: Your Aid Towards Progressiveness

Lighthouse is a tool that analyzes your website or web application and helps you improve its quality by providing advice on different fronts: speed, performance, progressive web apps, accessibility, etc.
Today it comes in different formats:
- a Chrome extension that you can run on any website (in the near future it’ll be a part of Chrome Dev Tools)
- an npm package that allows you to run lighthouse from the command line and integrate it with your build and CI tooling (
npm install -g lighthouse)
With the Chrome extension you just click on the Lighthouse icon:
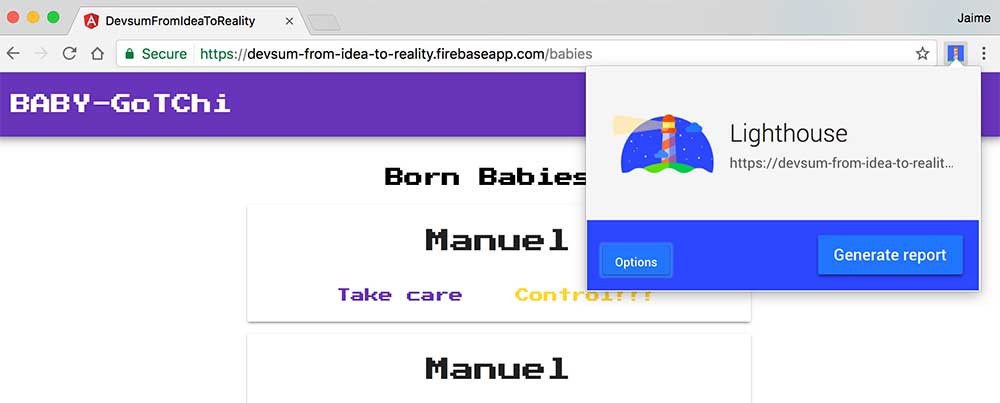
Then click on Generate Report, which triggers Lighthouse to perform a series of tests and TaDa! You get an awesome report of your website degree of awesomeness:
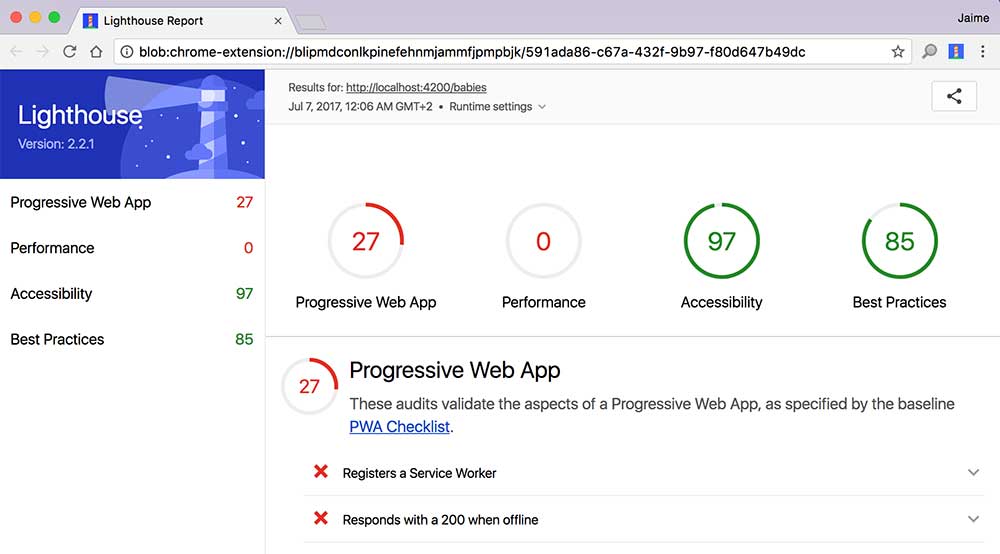
Looks like the baby-gotchi web app running on our webpack development server is not doing so well on the PWA nor on the performance fronts. Ouch! Well, it wasn’t meant to anyway.
So what to do next? Let’s try to improve our PWA score by going through the items in the list.
Our next improvement, as depicted in the list, is to register a service worker. If I click on this item and expand it, Lighthouse tells me the following:
The service worker is the technology that enables your app to use many Progressive Web App features, such as offline, add to homescreen, and push notifications.
Wow! Nifty! And it also points me to a website where I can learn more about Service Workers and how to register one. Cool right?
So, in a vanilla JavaScript app you’d need to go down to the metal, register your service worker, and do everything from scratch. Angular, being fixed on the goal of providing an awesome end to end platform to develop web apps simplifies this process for you.
Angular And Progressive Web Apps
The web standards that underpin Progressive Web Apps, and particularly service workers, are composed of a series of primitive operations that follow the extensible web manifesto. They give you lots of access and low-level operations to fully control the experience but they do require that you write a lot of boilerplate code.
The idea is that framework builders (such as the Angular team) write abstractions on top of these APIs to simplify building PWAs to the consumer of these frameworks. Angular has a ton of information about how your application works by virtue of using the different programmatic constructs that Angular provides such as modules, components or routing. Ideally, with all of this information and some additional configuration, Angular should be able to generate a service worker that would help your Angular app become a Progressive Web App.
There’s still a lot of flux in the current development of PWA support for Angular, but it looks like these tools will be embedded or controlled within the Angular cli which fits naturally in the development workflow of most Angular developers. This great talk from this year’s Google IO gives lots of insights into how the core team is developing PWA support for Angular:
As it is today, the process for creating a PWA with Angular is partly baked into the Angular cli and partly a manual process. Before we start building baby-gotchi into a PWA, let’s do a quick introduction to the most important technology in the PWA arsenal: the Service Worker.
The Heart of Progressive Web Apps: Service Worker
Traditional web applications assume that the network is always reachable. This is a mindset driven by the pervasiveness of desktop web applications always connected to the internet which no longer reflects reality. We’re seeing that more and more people are experiencing the web through mobile, increasingly in the so-called developed world and even faster in emerging markets.
The mobile web is characterized by slow, flaky or even non-existent network connectivity which breaks the premise above and results in a sub par experience (but for the downasaur, the downasaur is awesome):

A bad user experience that becomes even worse when the alternative are gorgeous native apps with great performance and which can provide offline features (at the very least loading and showing something to the user).
And this is where Service Worker comes in. It is a relatively new web standard that consists in a client-side proxy which sits between your application and the network, and lives regardless of whether your web app is open or not.
This proxy can listen to your app network requests and respond with cached responses, or listen to network responses to update the cache, or pre-cache certain parts of your application and provide a lightning fast response to a frequent user action, or react to data being pushed from a web server to update your application’s state via background sync or show push notifications, etc, etc. (The possibilities are endless!)
By making this space between your application and the network programmable, all of the sudden we enable the possibily of having first-class offline experiences in the web, and something more akin to the great user experience of native apps.
Moreover, we move offline from being an application level concern, to be some of a platform level concern that is completely handled by the service worker and supporting APIs.
By moving all of this logic inside a service worker you can simplify your application’s logic that will now transparently interact with the web server and remote web services as if the network connection is always available. Regardless of the quality of your network, the service worker will take care of things and provide the best response possible to your application on a per use-case basis. I do not know what you think, but this feels like a super elegant solution to me.
So How does service worker code look like?
I will not go into a lot of detail since this is a complete topic in and of itself, but I’ll show you a little bit of its API so you can get a general idea.
The first thing that you need to do in order to implement a service worker in your app is to register it, which essentially means telling your application to load the javascript file that contains your service worker’s code:
// check service worker is supported
if ('serviceWorker' in navigator) {
  // register service worker
  // point to where the code for the service worker is located
  navigator.serviceWorker
    .register('/service-worker.js')
    // the register method returns a promise
    .then(function(registration) {
      // registration succeeds
      console.log('Registration succeeded! Yey!')
    })
    .catch(function(error) {
      // registration fails
      console.log('Registration failed:', error)
    })
}
The service worker itself consists on a script where you can subscribe to events such as a network request to get some asset and handle that event to return a cached result or do whatever it is you want to do.
For instance:
// whenever the application fetches some data from the network
// handle that request using the 'handleFetch' method below
self.addEventListener('fetch', function handleFetch(e) {
  console.log('[ServiceWorker] Fetch', e.request.url)

  // respond with the following...
  e.respondWith(
    // if there's a match in the cache for
    // that particular request...
    caches.match(e.request).then(function(response) {
      // ... then return it
      // otherwise go to the network
      // to get that data
      return response || fetch(e.request)
    })
  )
})
If you are interested in learning more about service workers this talk titled “Instant Loading: Building offline-first Progressive Web Apps - Google I/O 2016” by the mighty Jake Archibald is as good as it gets:
Turning The Baby-Gotchi Into a PWA
Ok, so back to the baby-gotchi! We’re going to use the Angular Mobile Toolkit to turn our web app into a PWA automagically. To give you an idea of our end goal this is a video of the end user experience after we’ve completed making baby-gotchi a PWA:

Cool right? It looks just like any other app on my phone.
In order to get started enhancing baby-gotchi into a PWA we will need to add a new package to our application, the @angular/service-worker:
PS> npm install --save-dev @angular/service-workerAnd update our Angular cli configuration to enable the Angular Service Worker. You can do that by running this command:
PS> ng set apps.0.serviceWorker=trueOr, alternatively, by updating the serviceWorker option in your .angular-cli.json file:
{
   //....
      "serviceWorker": true,
   //...
}
From now on, every time you build your application for production, Angular will generate a service worker and register it in your index.html file. Let’s test it.
We start by running a production build with the Angular cli:
PS> ng build -prodIf you now take a sneak peek in the dist/index.html file you’ll be able to see the following line:
<script type="text/javascript" src="sw-register.e4d0fe23aa9c2f3a68bb.bundle.js"></script>Which loads a script to register your service worker just like you saw in the previous section:
'serviceWorker' in navigator &&
  navigator.serviceWorker.register('worker-basic.min.js').catch(function(r) {
    console.error('Error registering service worker:', r)
  })
From the service worker registration code above we can see that the service worker code itself is in a new file called service-worker.min.js. This code is minified and completely beyond the understanding of mere mortals (if you’re interested into knowing its implementation you can take a look at @angular/service-worker on GitHub). The file contains code to install and activate your service worker, register new caches, clean old caches, setup asset pre-caching, setup caching strategies for different types of content, etc.
The final element in the puzzle is ngsw-manifest.json (aNGular Service Worker). This file is a declarative configuration of your service worker. It is used by service-worker.min.js to setup the service worker configuration for your angular app. If we take a look at the file that was generated in this first run, you’ll see the following:
{
  "static": {
    "urls": {
      "/polyfills.859f19db95d9582e19d4.bundle.js":
        "afac7bb7a75d8e31bca1d0a21bc8a8b8d5c8043c",
      "/main.ce8d807001f5dd806115.bundle.js":
        "f3f4044b65a36c15fc50c71fdb47f70a97f58ddf",
      "/sw-register.e4d0fe23aa9c2f3a68bb.bundle.js":
        "2a8aea5c32b446b61dab2d7c18231c4527f04bdc",
      "/vendor.17bb32ae2d64e04ad43d.bundle.js":
        "d19a0ab00c9ff8203a956a703ebac6e61d2d6b2a",
      "/inline.379cfc4043b97f1329c8.bundle.js":
        "f980979aada645b446a74c6f70713819b6e26cde",
      "/styles.57e339f0cb0ecf0ab8e4.bundle.css":
        "f6a8eec7317532b1c28ae2e7ad70fe4e3924dac9",
      "/favicon.ico": "84161b857f5c547e3699ddfbffc6d8d737542e01",
      "/index.html": "319eca89c80b1deef1a93b9d722d057c2398b857"
    },
    "_generatedFromWebpack": true
  }
}
The file contains a list of all the static assets of our application and a hash used for versioning. The Angular service worker will use this information to pre-cache all the assets when installing the service worker. These assets are the bare minimum needed for your app to be able to run, what we typically call, the app shell.
Let’s make a recap before we continue. Enabling the service worker flag and doing a production build will:
- Inject a service worker registration script inside
index.html - Create a service worker registration script
sw-register.Gobbledigook.bundle.js - Create a service worker script
service-worker.min.js - Create a service worker configuration file
ngsw-manifest.jsonwhich a basic configuration to setup an app shell.
Ok, back to the app shell…
What is an App Shell Exactly?
The app shell or application shell is the minimum amount of UI that you need to show to your users when your web application starts. Literally, it is the shell of your application, and is typically constituted by some static assets (HTML, CSS, JavaScript). The purpose of the app shell is to give the appearance that your application loads instantly and to provide an awesome perceived performance for your users.
Since the application shell is minimal it will load super quickly and it can be easily cached. You’ll typically pre-cache your application shell during the installation of your service worker. This will ensure that the next time a user visits your site it will have a minimal offline support via the application shell, that is, at the very least, the user will be able to see the application shell.
The application shell it is just a starting point. As soon as it is ready you’ll start loading other dynamic content from the network or from the local cache.
Addy Osmani has a great simile for the app shell that puts my three previous paragraphs to shame:
Put another way, the app shell is similar to the bundle of code that you’d publish to an app store when building a native app. It is the skeleton of your UI and the core components necessary to get your app off the ground, but likely does not contain the data.
Let’s go back to baby-gotchi and see the app-shell in action. If you remember, the Angular Service worker is automatically configured to pre-cache all the static assets for our app shell.
If we load the production build of our application in an HTTP server (for instance node’s http-server):
PS> http-server dist

Starting up http-server, serving dist
Available on:
  http://127.0.0.1:8080
  http://192.168.0.2:8080
Hit CTRL-C to stop the serverThen open the browser, type the http://127.0.0.1:8080 url, open baby-gotchi, then the Chrome Developer tools, the Application tab and you’ll be able to see the following:

Yey! There you go, the service worker has been registered, installed and activated!
Close the browser, open it again, go to baby-gotchi and let’s take a look at the network tab this time:
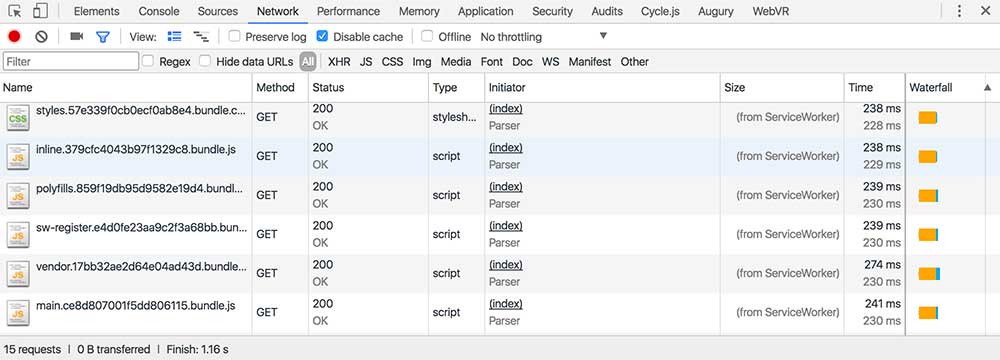
All of our assets are now loading from the service worker cache (you can take a look at Application and Cache Storage to see exactly what your service worker has cached by the by).
Interesting! If all these assets are cached in our service worker then that means that we should be able to see the app shell if our application is offline, isn’t it? Let’s try it. What will happen with baby-gotchi if we severe our previous network connection?

TaDa! That’s your application shell right there in offline mode. Since we haven’t told the angular service worker how to cache our pixel font it’s displaying the text in the best way it knows how. Let’s see how we can solve that pesky issue next.
Caching External Resources
As we saw in the previous section, when you enable the service worker flag in your Angular cli configuration Angular will automagically generate a service worker for you and will setup the app shell for your application.
After that you can improve the progressiveness of your Angular application by extending the service worker configuration with hints and additional information. If you create a ngsw-manifest.json in your root application folder, the configuration that you put there will be included in the generated ngsw-manifest.json and will be used by the service worker in production.
In the case of external resources like the webfont that we described above we can add the following section to the new ngsw-manifest.json file under the external key:
{
  "external": {
    "urls": [
      {
        "url": "https://fonts.googleapis.com/icon?family=Material+Icons"
      },
      {
        "url": "https://fonts.googleapis.com/css?family=Press+Start+2P"
      }
    ]
  }
}
Now if we run a new build:
PS> ng build -prodYou’ll be able to see that the generated ngsw-manifest.json under the dist folder includes this bit of configuration. And if we host the folder with the http-server you’ll be able to see how, when you set the offline mode, the beautifully pixelated font is right there. Yiho!
Sweet. Let’s run our good friend Lighthouse again and see how we are doing in our PWA transformation:
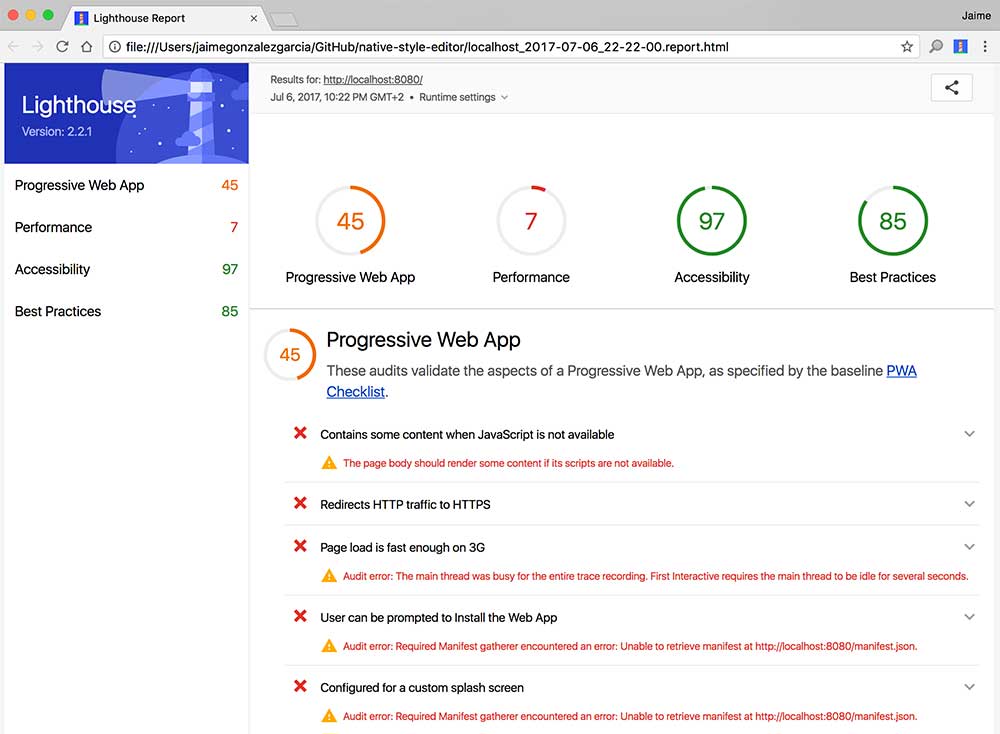
Sweet! Our PWA score has increased to 45! Yippi! Let’s look at the list and see what we can do next… “User can be prompted to install the Web App”… that sounds interesting…
Increasing Your App Engagement With The App Manifest
One very common thing for native apps that is not that common with websites is that they have a place in your mobile phone home screen. You take your phone, swipe away the screen saver (does one call these things screen savers these days?) screen lock! Swipe away the screen lock and there they are, your favorite apps, smiling back at you.
Wouldn’t it be nice if your beautiful web app could use that same real state? Entice the user with an awesome app icon? If it could open, show a sleek splash screen and then load inside a chromeless interface just like any native app in your phone?
Well, that’s what the Web App Manifest is for. A standard way to configure how your web app will look and behave inside a mobile environment. For instance:
- Which icon will it use?
- Which color scheme?
- What name will it display?
- Will it be shown chromeless or with a browser navigation bar?
In terms of technical implementation, the Web App Manifest is a json file that contains all these details. For intance, here’s an example of a Web App Manifest for baby-gotchi:
{
  "dir": "ltr",
  "lang": "en",
  "name": "Baby-Gotchi",
  "scope": "/",
  "display": "standalone",
  "start_url": "./?utm_source=web_app_manifest",
  "short_name": "Baby-Gotchi",
  "theme_color": "#f27b00",
  "description": "",
  "orientation": "any",
  "background_color": "#3a1c8d",
  "icons": [
    {
      "src": "/assets/launchericon-192-192.png",
      "type": "image/png",
      "sizes": "192x192"
    },
    {
      "src": "/assets/launchericon-96-96.png",
      "type": "image/png",
      "sizes": "96x96"
    },
    {
      "src": "/assets/launchericon-48-48.png",
      "type": "image/png",
      "sizes": "48x48"
    }
  ]
}
The names of the options are very self-explanatory but if you want to find information about each one of them and the options that you have available I recommend you to take a look at this awesome article on the Google Developers blog.
Ok, so we have our Web App Manifest which is typically called manifest.json in our app src folder and now we need to somehow make our Angular app aware of it. We do that in two steps.
First, we let the Angular cli know about its existence. In order to do that we update the .angular-cli.json file to include an additional asset in the assets section:
{
  "$schema": "./node_modules/@angular/cli/lib/config/schema.json",
  "project": {
    "name": "baby-gotchi"
  },
  "apps": [
    {
      "root": "src",
      "outDir": "dist",
      "assets": [
        "assets",
        "favicon.ico",
        "manifest.json" // <==== here
      ],
  // etc
}
This will tell the Angular cli and webpack to include this file in our Angular app.
Second, we add a link tag to our index.html that will identify the manifest.json file as the Web App Manifest of our application. Open the index.html file in your project and add the following link tag in the header:
<!doctype html>
<html lang="en">
<head>
  <meta charset="utf-8">
  <title>Baby-Gotchi</title>
  <base href="/">

  <meta name="viewport" content="width=device-width, initial-scale=1">
  <link rel="icon" type="image/x-icon" href="favicon.ico">

  <!-- PWA -->
  <link rel="manifest" href="manifest.json">
  </head>
  <body>
  <!--- etc --->
  </body>
</html>
And that’s it. Now our web app has a Web App Manifest that tells every mobile environment that supports this standard how to interact with the web app: it will prompt a frequent visitor to add the web app to his or her home screen, it’ll display a cool icon, show a sleek splash screen when opened, render chromeless like a native app, be discoverable in the play store, etc, etc.
If we again run a production build of the app:
PS> ng build -prodThen deploy it to Firebase using the Firebase cli:
PS> firebase deploy --only hostingAnd finally run Lighthouse, we’ll see that our app now has a much better PWA score:
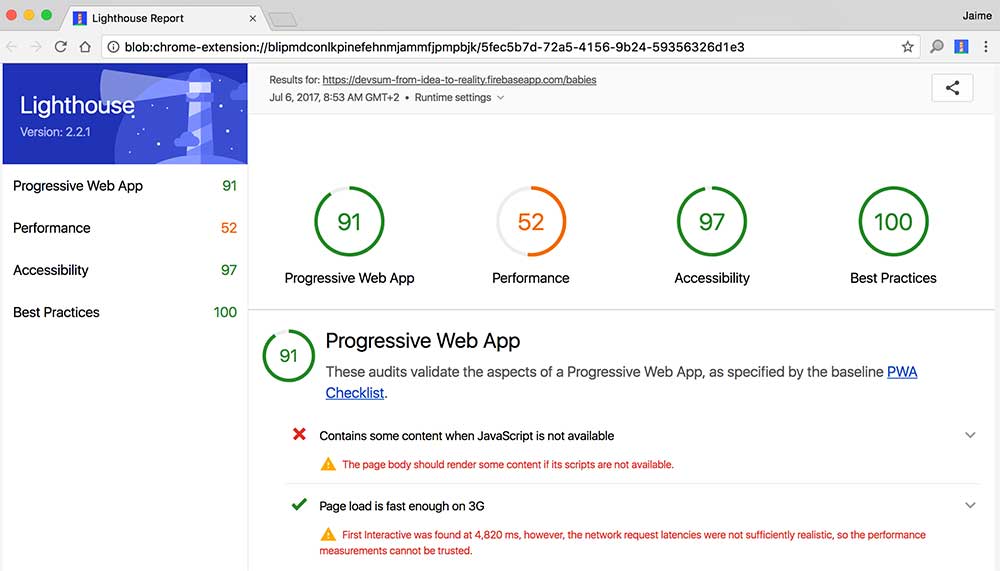
But even better, we can install it like an app on our phone! Yey!
Concluding
And that’s it! This is the end of this Angular and Firebase series! Congratulations on making it to the end!
In this series you’ve learned how to bring an idea to life using Angular and Firebase. You created an app from scratch, from idea, through prototyping, to an interactive Angular app hosted on Firebase that not only works on desktop but also provides a great experience on mobile.
You discovered how you can use the Angular cli to boostrap a new Angular app, provide a great development environment, generate your components and services and build your app ready for production.
You took advantage of different services within Firebase to quickly implement a backend for your web app. You stored your data in Firebase Realtime Database, hosted your web app in Firebase Hosting, and programmed arbitrary server-side logic with Firebase Cloud Functions.
Finally, you learned about Progressive Web Apps and how to improve the user experience of your web app to provide an app-like experience. You used the Angular mobile toolkit to configure a service worker, the app shell and the web app manifest.
Awesome job! Now take all this knowledge and build your own idea! Your next cool project is just one ng new away. Go for it! :)
Want To Learn More About Progressive Web Apps?
Here are some awesome resources that you can use to continue learning about Progressive Web Apps:
- Progressive Web Apps on Google Developers
- Progressive Web Apps Instructor Lead Training
- The offline Cookbook
- Hacker News PWA - a collection of HN readers as PWA implemented in popular web frameworks
- Max’s guide on implementing PWA with Angular
- Pascal just did a great talk on service workers at Angular Camp 2017
Bonus Exercises: Offline Dynamic Data and Push Notifications?
Yep! There’s still tons to do to provide a great user experience for the loyal baby-gotchi users. As a bonus exercise I leave you offline caching of data (non trivial given the fact that Firebase uses websockets which are out of the scope of service workers) and push notifications. Because every dad wants to get a push notification when his baby’s life goes below 50. Have a great day! :)

Written by Jaime González García , dad, husband, software engineer, ux designer, amateur pixel artist, tinkerer and master of the arcane arts. You can also find him on Twitter jabbering about random stuff.
